Introduction
We built
Parima
to allow front end developers an easy way to launch their sites into the cloud that gives them full control over a scaleable and cost-effective deployment and distribution process, using Amazon Web Services (AWS).
While Parima works for static HTML sites and static website generators like Hugo and Gatsby, it can also be used for sites and applications built using JavaScript frameworks like Angular and React JS.
To illustrate this, we've created this tutorial to showcase how to build a multi-page Angular website with a sane utility class CSS (Tailwind), and then to deploy it to AWS using Parima. We are handling this step by step from installation to deployment, so even developers who are brand new to Angular or JavaScript frameworks should hopefully be able to follow along.
Angular 10 uses TypeScript, which is a way of structuring your JavaScript project in a way that should make your task easier. Files have the extension
.ts
and have some syntax that may be unfamiliar to developers who are used to JavaScript, but Angular makes TypeScript relatively simple for what you'll need to accomplish.
In addition to the TypeScript (.ts) file, there is an HTML file with the Template (HTML plus some Angular Directives for outputting data or adding events), as well as an SCSS file for styles (which is not used too often with Tailwind CSS), and a Test file (spec.ts) that is not part of this tutorial.
What You Need for this Tutorial
-
Around one hour
-
A favorite text editor or IDE
-
Node v12.16.3 and NPM v6.14.4 (to be installed as part of Step 1)
-
Access to an
AWS account,
preferably with Root Access
Note:
The full Source Code for this Tutorial is available on
GitHub.
Step 1: Prepare your Node/NPM Environment
For this tutorial, we will use Node and NPM for our Angular 10 and Tailwind CSS installation. We are using Node v12.16.3 and NPM v6.14.4.
Note:
For Mac/Linux, we recommend using
Node Version Manager (nvm)
when working on multiple projects using Node or NPM.
(Windows has
https://github.com/coreybutler/nvm-windows,
but we have not tried it out.)
Step 2: Install Angular 10 CLI
Step 3: Generate a new Angular 10 Project
We will name our project "parima-angular-tutorial".
Angular CLI will ask two questions during the installation; we will use SCSS for our styles and will want to include Angular Routing.
If no errors, Angular CLI will have created a subfolder under your current path named "parima-angular-tutorial".
The next step will include changing to that subfolder.
Step 4: Add Tailwind CSS
Adding Tailwind CSS is an optional step; you could use Bootstrap or another CSS framework, or just write your own CSS.
We use Tailwind CSS at FormKiQ because we believe it's the most effective CSS framework available.
Our examples will use Tailwind CSS utility classes for styling content, but it's easy to strip those classes out and replace them with something different.
This tutorial uses
https://github.com/ngneat/tailwind
to add Tailwind CSS to this Angular 10 project.
This schematic is new and is easy to use, but please note that, as of this writing, it was not instantly compatible with the pre release version of Angular 11.
The ngneat schematic will also ask about your preferred stylesheet format.
This should match your earlier choice, which in our case was SCSS.
Step 5: Test Your Installation
You should now be able to compile and run a local version of your Angular Project:
Note:
if you receive the following error,
"An unhandled exception occurred: merge is not a function",
you are likely using the pre release version of Angular 11. The ngneat schematic uses webpack-merge, and this appears to be causing an issue with the pre release version.
If the compilation was successful, you should see a message similar to this:
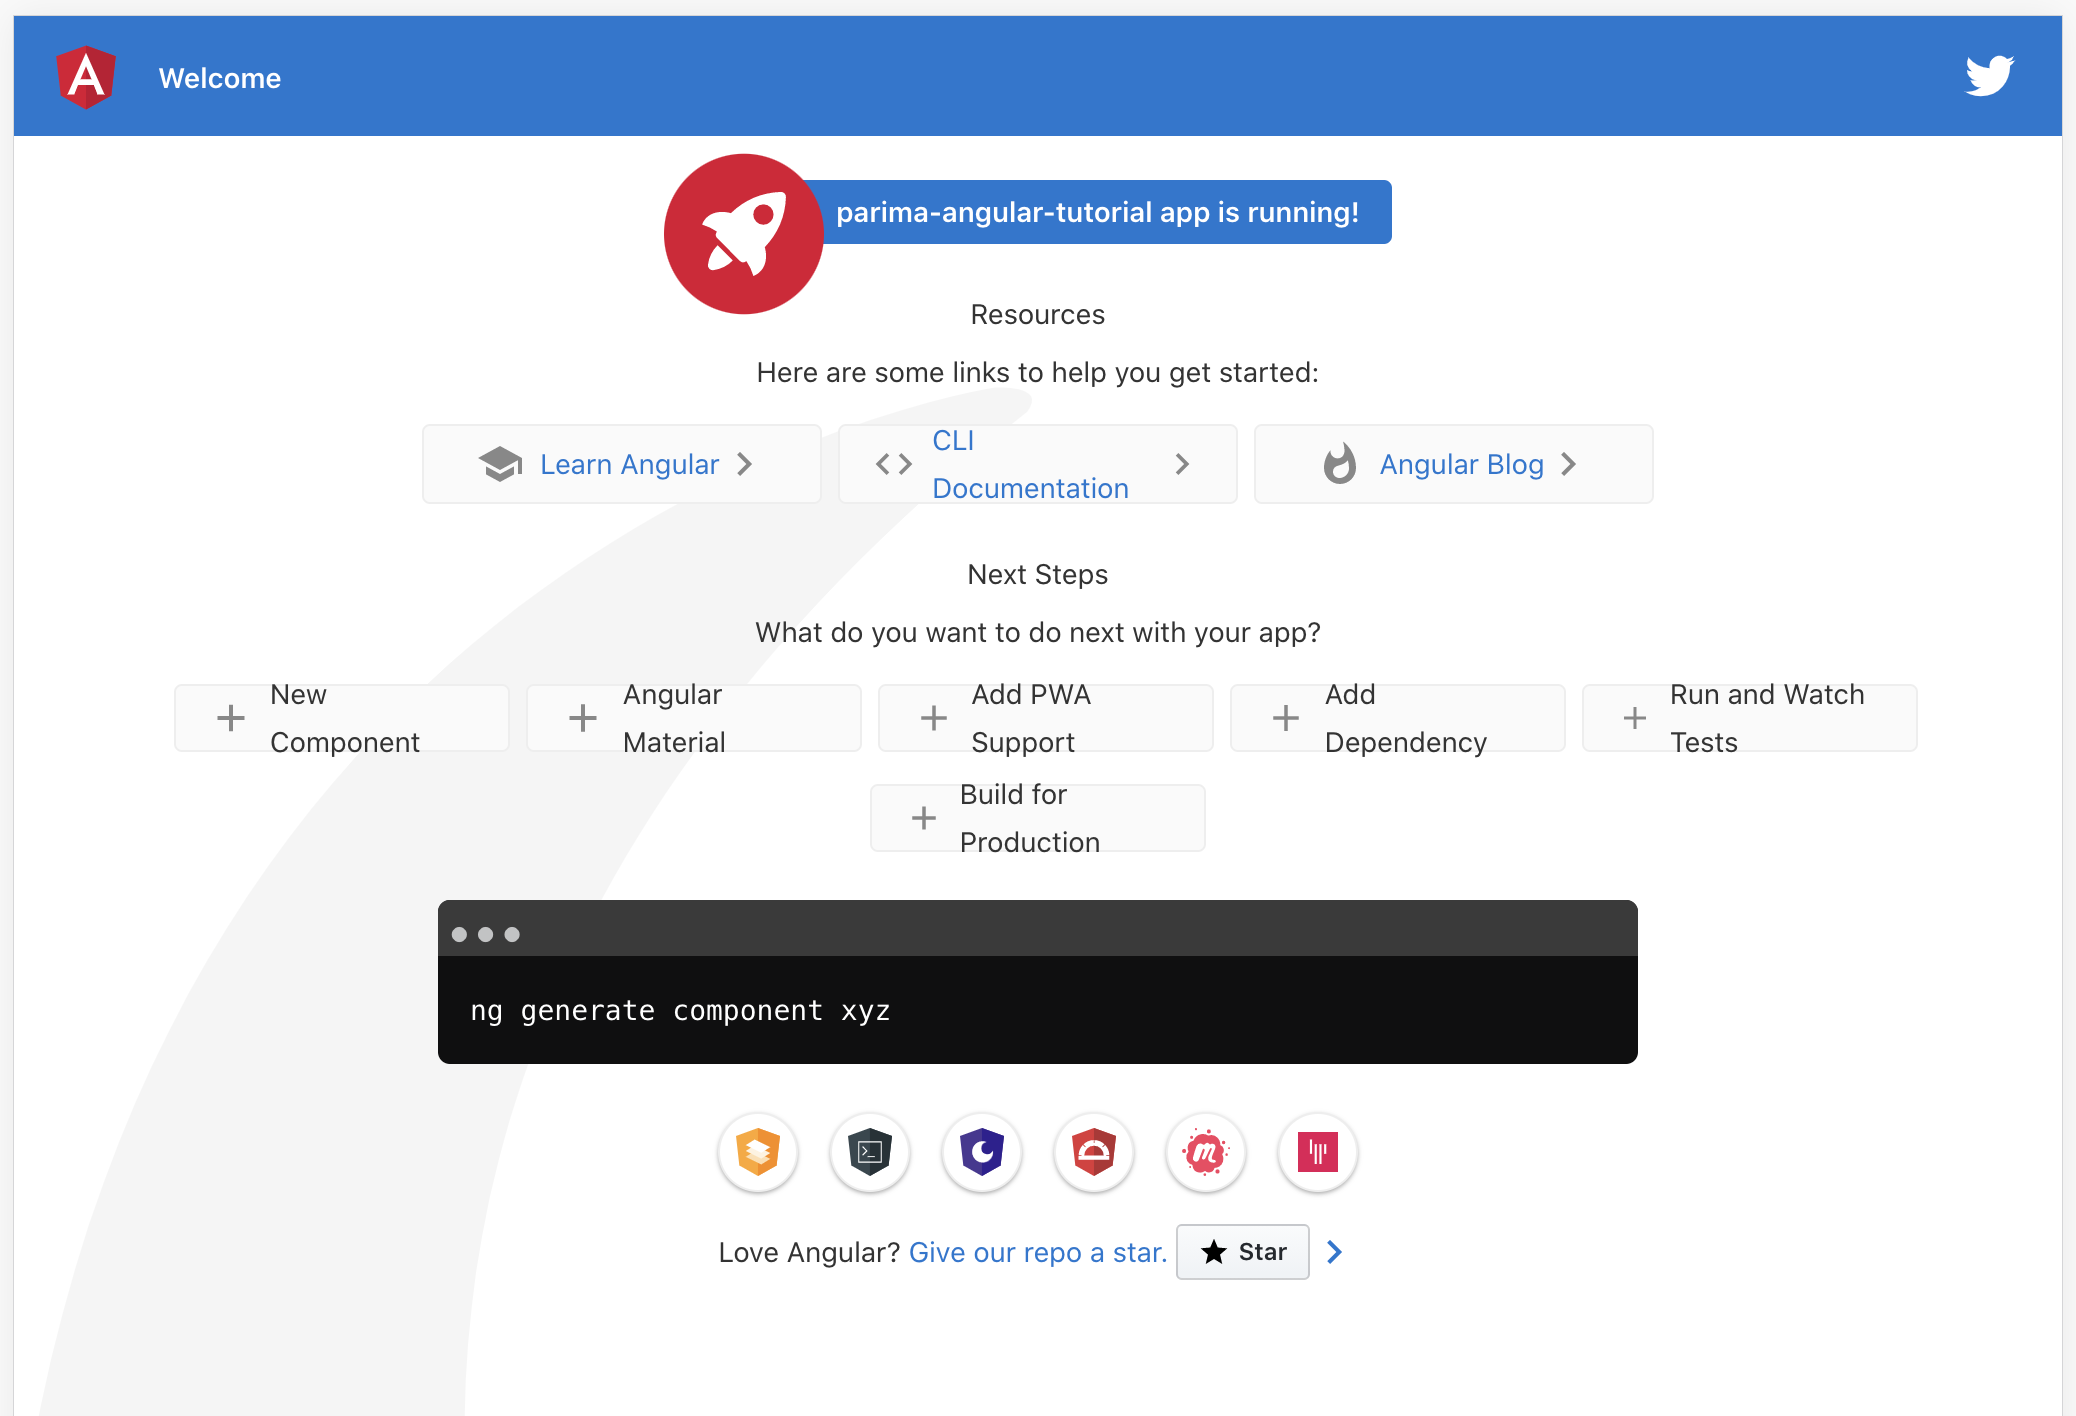
Open a browser and go to
http://localhost:4200/
and you should see something similar to this:
This means that our core Angular 10 and Tailwind CSS set up should be working. Now we can add some components and create a basic design.
Note:
You can stop the Angular Dev Server (localhost:4200) at any point with [Ctrl] + [C], but it will automatically refresh changes to most files.
Adding new components or modules, however, may require you to stop and then start your Dev Server again with "ng serve".
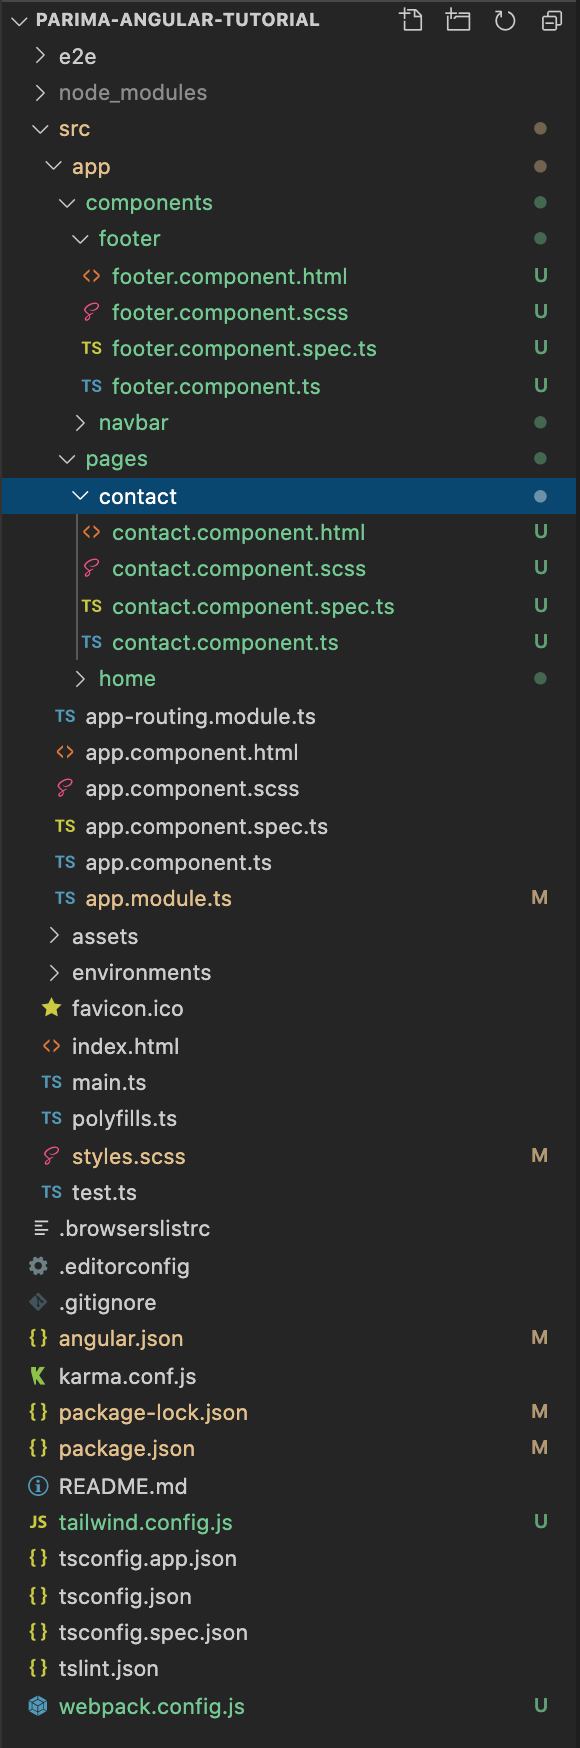
Step 6: Create Page and Layout Components
By default, Angular 10 does not create any components aside from the base component, AppComponent.
It also creates an AppModule to load that component, and, since we asked for routing, an AppRoutingModule to handle different routes (usually for pages on the site that will have their own URLs).
For this tutorial, we will split our components that we will be adding into
pages
(for page components)
and
components
(for layout components), using subfolders.
Page and layout component files are indistinguishable to Angular, so this is an easy way to keep track.
This should give you a directory structure that looks like this (with some folders collapsed):
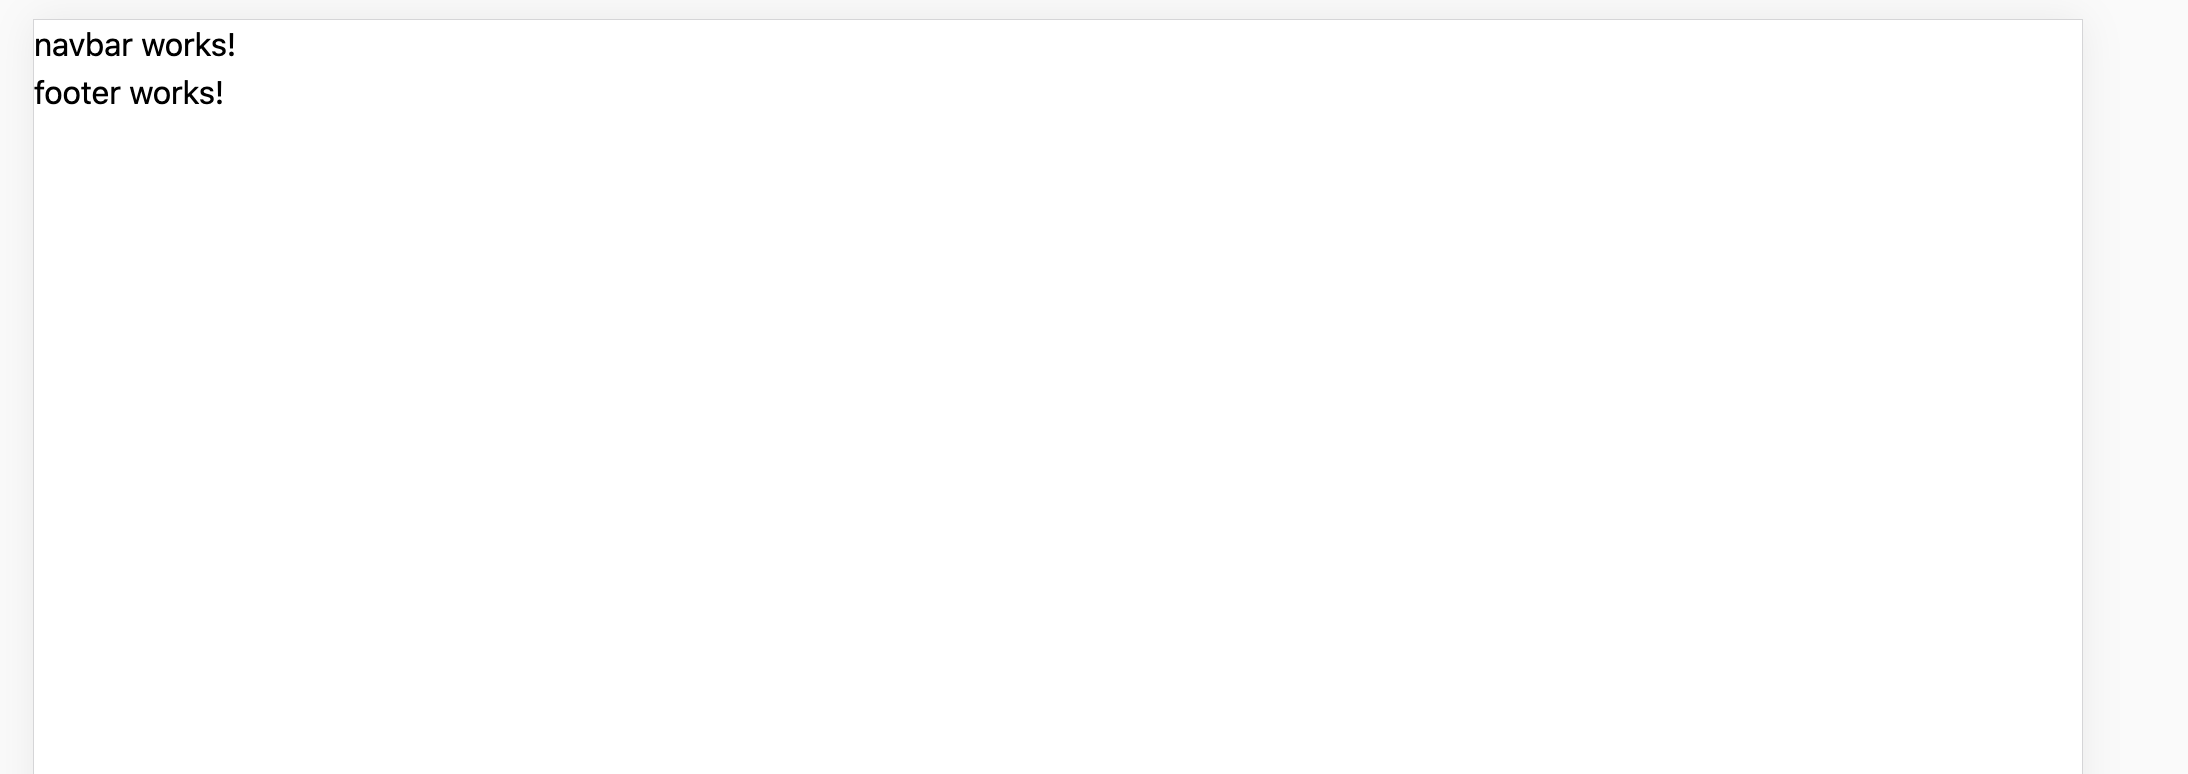
Step 7: Add Layout Components to the Base AppComponent
We can now replace the placeholder page from the initial Angular project installation with Component Tags that reference the Layout Components that we've just generated.
The file
src/app/app.component.html
contains a large amount of placeholder code, everything but the last line of code in the file.
But in our case, we can just remove all of the code, and replace it with these three lines:
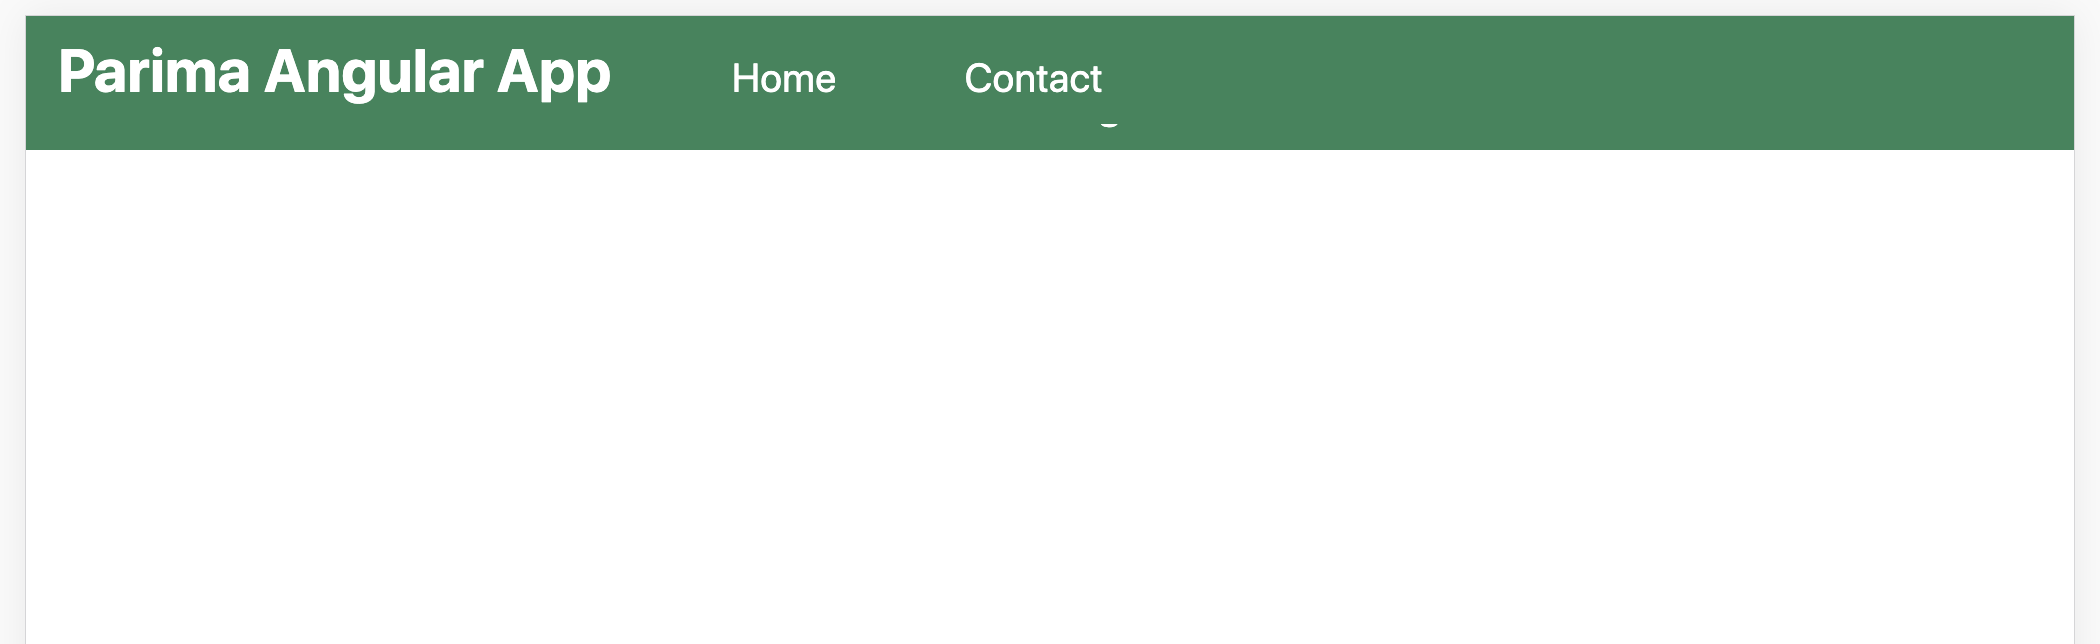
The first line is the Component Tag for the Navbar Layout Component, while the last line is the Footer Layout Component. This middle line is the Router Outlet Component, which is a built-in component that handles the routes we are about to set up. Running the dev server should now show a page that looks like this:
Step 8: Add Routes for the Page Components
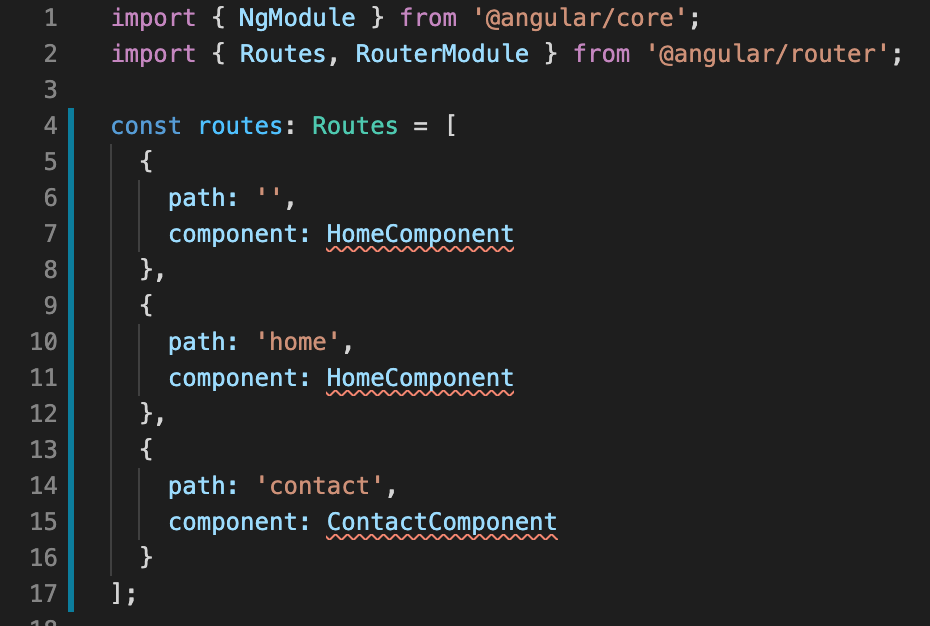
We have generated two Page Components, Home and Contact, and in order to display them, we will need to add instructions for the AppRoutingModule. In the file
src/app/app-routing.module.ts, you can add your route entries. The current
routes constant is an empty array:
We will add both of our Page Components, using Home as our default root/entry component:
The blank path for the first route entry tells Angular to load the Home Component when arriving at the root of the website.
Adding these three routes will likely cause an error or warning in your IDE, since we have not yet told the AppRoutingModule where to find these two Page Components:
In order to fix this problem, we need to provide the path of the TypeScript files for these components. (The TypeScript files are in charge of telling Angular how to find its corresponding HTML, SCSS, and test [SPEC.TS] files.)
Add the following module imports at the top of the file, just below the existing ones (the imports for NgModule, Routes, and RouterModule):
The complete
AppRoutingModule
file should now look like this:
And your browser (assuming you're still running the dev server) should look like this:
Step 9: Create the Navigation Bar
Of course, to go from our Home page to our Contact page, we will want a way to navigate, such as a Navigation Bar. Combining Angular and Tailwind CSS make it simple to have a responsive site or application, and the nav bar is a big part of that.
We will use a hamburger menu for smaller screens (like mobile phones). This menu will be toggled by a button, and we will need a true/false value to tell the component whether or not the hamburger menu should be open and visible.
You can add the following code to
src/app/components/navbar/navbar.component.ts:
Here is the code for the nav bar component template
(src/app/components/navbar/navbar.component.html)
that we can paste in to use for our project:
Step 10: Create the Footer
The footer only requires adding the following code to
src/app/components/footer/footer.component.html:
Note:
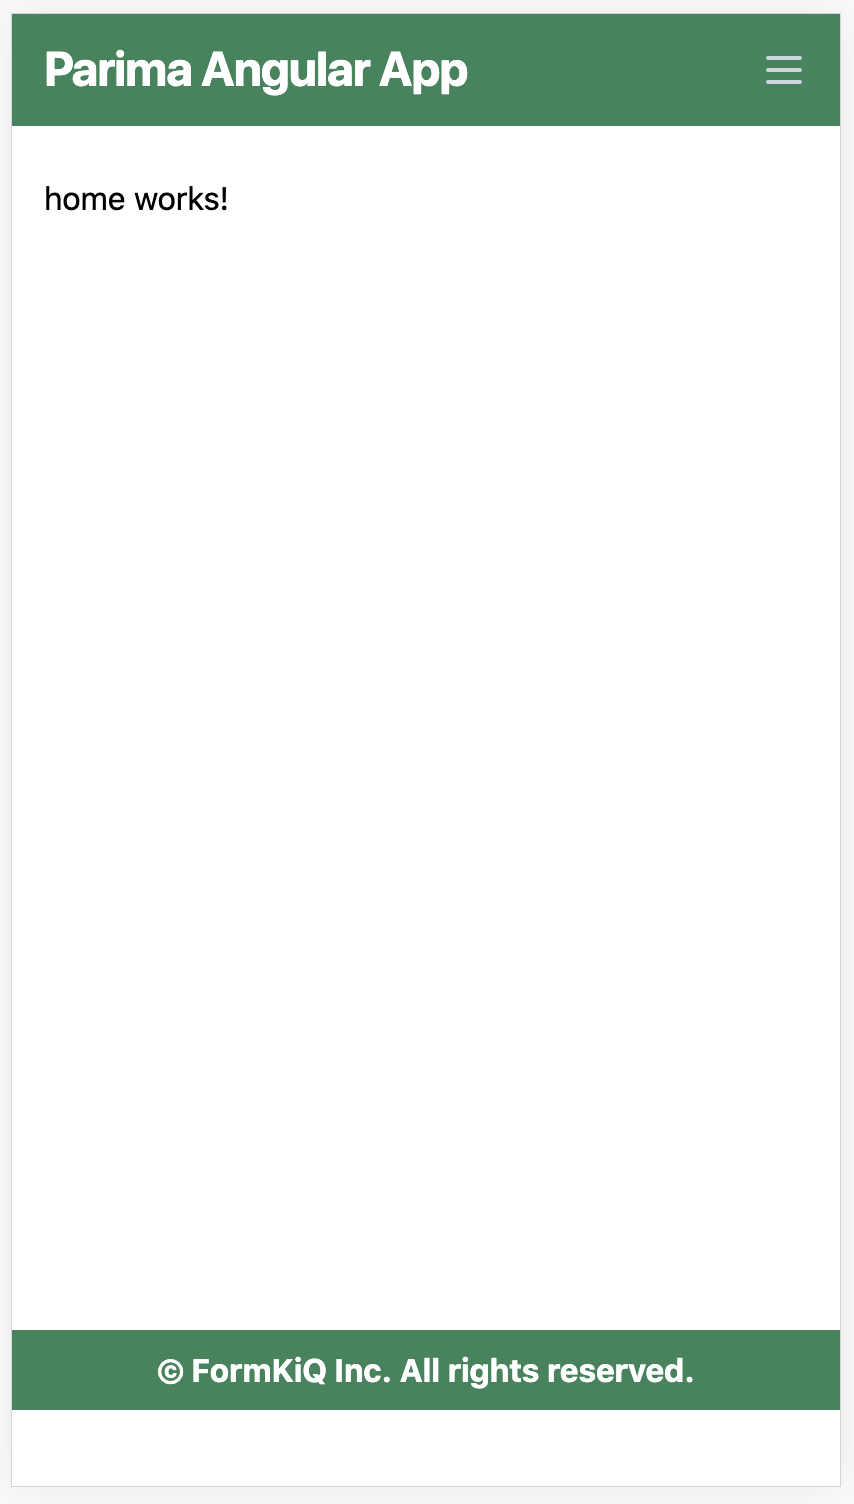
your dev server will show a much different page once you've added the Navbar and Footer components, with a different view based on screen width,
but you may notice that the "Home works!" text that was visible before isn't visible at all, and there is a strange cut off element at the bottom that on inspection is the bottom of the footer:
This is because the navbar is fixed, so it displays over top of the page content and most of the footer. We will add margins, padding, maximum width, and a minimum height to the Base AppComponent next.
Step 11: Add Layout HTML and CSS to the Router Outlet in the Base AppComponent
The Base AppComponent function as both the base component and the base template, so you can add HTML layout content in the
src/app/app.component.html
file. For our application, we would like to move the page content below the navbar, create a maximum column width for the page content, and we would also like to ensure that the footer is closer to the bottom of the page, even if there's little to no content on a page:
These utility classes as they are listed will not complete the layout, as Tailwind CSS does not have utility classes for "min-h-screen-85" and "min-h-screen-90".
This is a custom class that stands for a minimum height of 90vh. In order for it to work, we will need to add the value to
tailwind.config.js, at the root of the project:
Note:
Any change to
tailwind.config.js
requires a new compilation of your Angular Dev Server from scratch. Stop the current dev server, if running, using [CTRL] + [C], and re-run "ng serve".
Now the site layout should be complete:
Step 12: Create your Home and Contact Pages
In order to test out routing, we can remove the placeholder text and add a header to each content page:
src/app/pages/home/home.component.html:
src/app/pages/contact/contact.component.html:
There are a few other things that could be done to improve this Angular application, such as adding a click event on the navbar to close the hamburger menu when a nav link is clicked, or adding classes to show which nav item is active based on the page URL. But for the purpose of this tutorial, we will move on to building and deploying the app.
Step 13: Build the Angular Prod Bundle
Angular applications are built for production deployment using the following command:
This will create three bundled JavaScript files, as well as an index.html file, a css file, a 3rdpartylicenses.txt file, and a favicon.ico, all under the
dist
folder. All of these files will be uploaded into Amazon S3, but only after the Parima CloudFormation template has been deployed.
Step 14: Create your AWS Cloudfront Distribution using Parima
Follow the instructions from the
Parima README on GitHub
to use Parima to launch your application, as there are two different methods to choose from, through the AWS Console and through AWS CLI. There is also a Git deployment option in our roadmap as well, which will be added to the README once available. You can use a Custom Domain or a CloudFront URL will be generated for you.
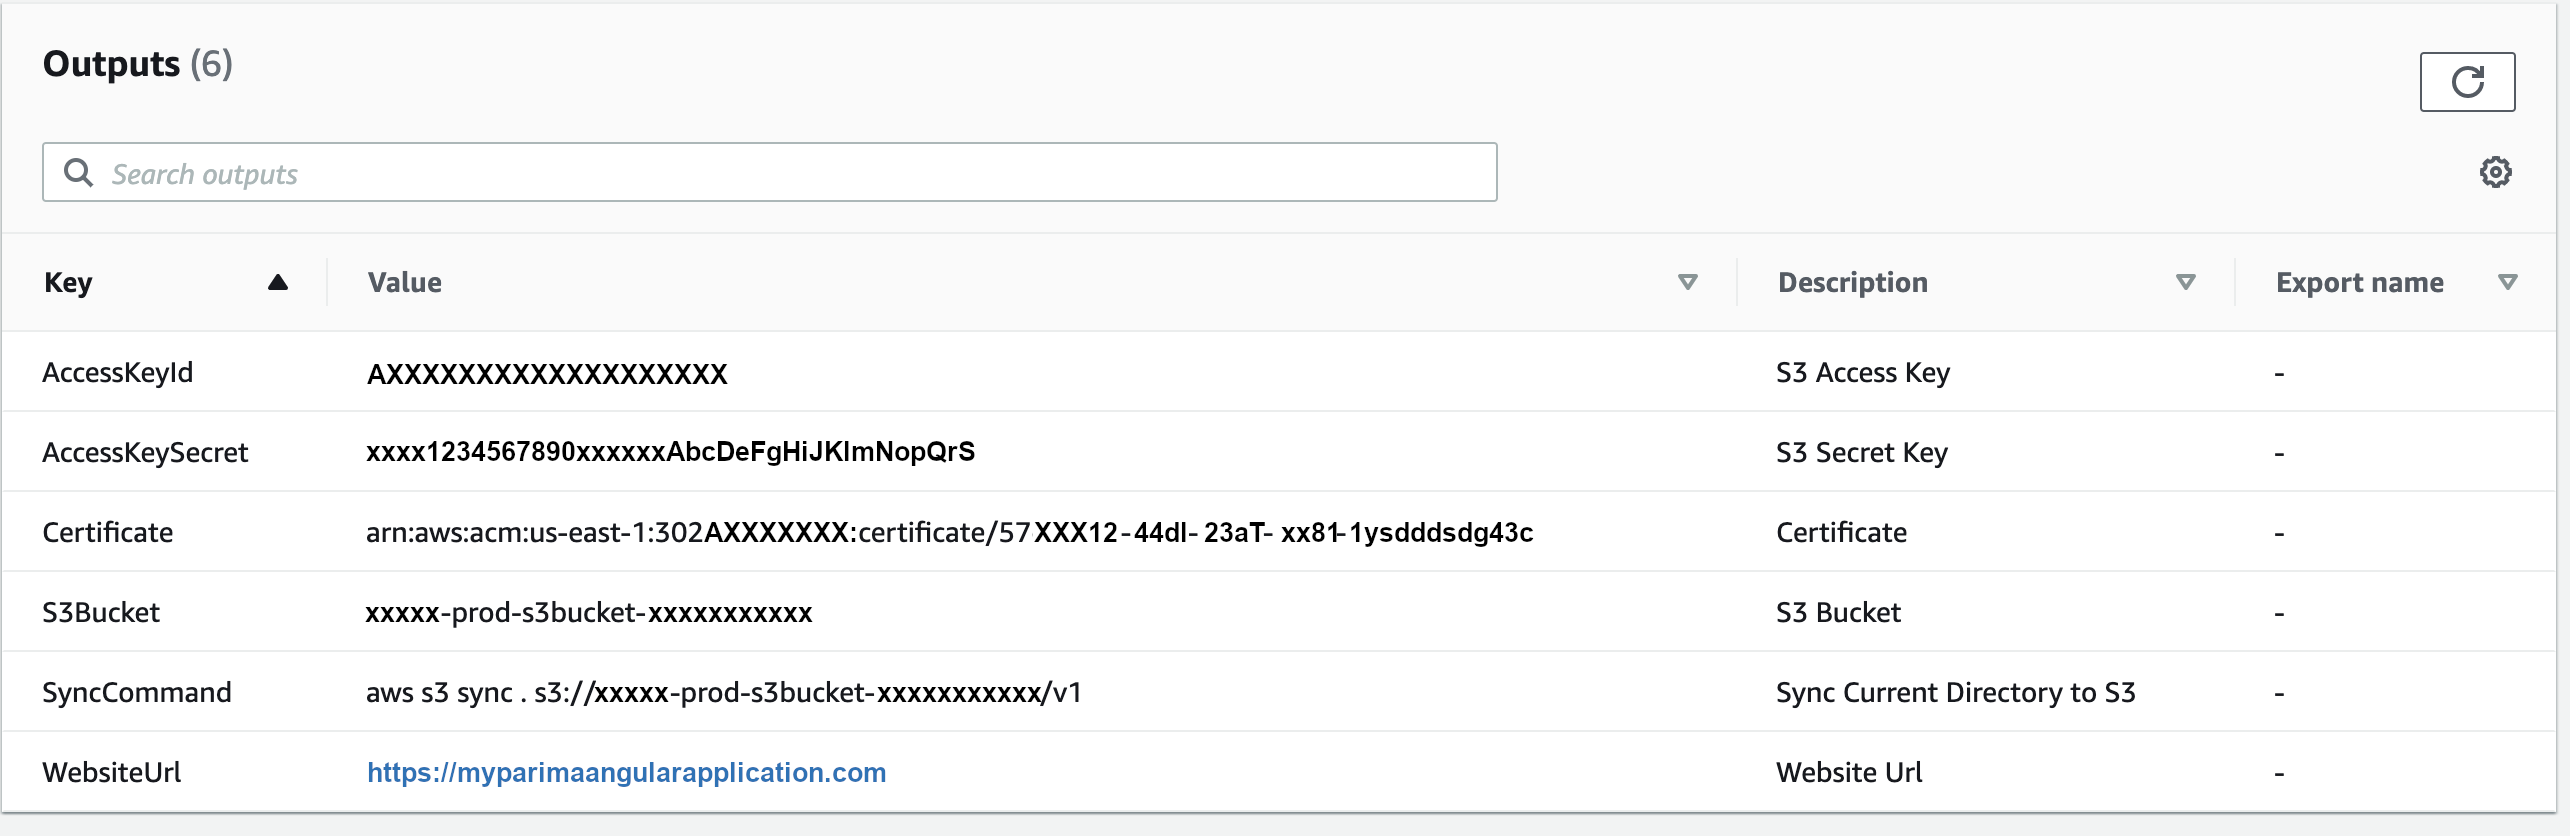
Once the CloudFormation template has been completed, you can click on the "Outputs" tab under your Completed Stack in CloudFormation to view the information you will need to set up the AWS S3 Sync that will deploy your application code.
Step 15: Deploy your Angular Application using AWS S3 Sync
Follow the instructions from the
Parima README on GitHub
to run the AWS S3 Sync command that is listed in your "Outputs" tab in CloudFormation.
Step 16: Test Your Application on AWS CloudFront
Open the
WebsiteUrl provided in the "Outputs" tab in CloudFormation to view your newly deployed Angular application.
 FormKiQ vs. Off-the-Shelf Software and Less Flexible SaaS When is FormKiQ a better choice than Off-the-Shelf Software and Less Flexible SaaS?
 FormKiQ vs. Building It Yourself How does FormKiQ save time over custom in-house solutions?
 Use Cases FormKiQ works for small and large workflows, across all verticals and industries.
 FormKiQ For Teams Find out how FormKiQ can work for your team
 FormKiQ For Industries Discover the advantages FormKiQ can bring to your industry
 Blockchain and Decentralized Storage Leverage web3 technologies including proof of work and distributed systems for document control and data privacy
 Content and Digital Asset Management Integrate with your preferred web content management system while leveraging FormKiQ for managing your digital assets
 Document Management Module Integrate all of the required functionality of a document management system into an existing software solution
 Integration with QMS or LIMS Add missing functionality for your Quality Management or Laboratory Information Management by integrating with FormKiQ
 Job Application Form Receive applications, including cover letter and resume attachments, and import into an existing HR Management System
 Legal Discovery Tool Find information quickly by combining full-text search with AI-powered document classification
 The Paperless Office: Digital Document Processing Collect, process, and store paper and digital documents, allowing for archival, integration, and future recall
 Product Leasing System Process client lease applications, including a credit check and approval workflow
 Company-Wide Break down the silos in your organization with a centralized control center for documents, ready for integration with any and all systems
 Engineering and Product Reduce development time and agony with battle-tested components for your applications
 Finance and Accounting Process paper and electronic invoices and receipts, ready for integration with your important systems
 HR and Recruiting Build and support your people across the organization by integrating with your essential tools
 IT and InfoSec Provision a secure document store with the encryption and controls needed for compliance and protection
 Legal Manage and safeguard contracts and other essential documents across systems
 Marketing Add better discovery and reliability to digital assets and other essential content, while enabling integration with a web content management system
 Sales Keep track of sales assets and contracts inside and outside of your CRM and other tools
 Accounting, Financial Services, and FinTech Standardize financial documents, metadata, and workflows across systems, teams, auditors, and clients
 Education, Training, and EdTech Integrate Learning Management Systems with other essential applications and tools
 Healthcare, Life Sciences, and MedTech Combine secure and compliant records management with laboratory information management systems
 Law Practices and Legal Services Ensure efficient legal discovery and case management
 Logistics and Transportation Provide a robust and customized solution for fleet management or other logistics needs
 Manufacturing, Production, and Utilities Control and distribute essential documents and standard operating procedures within and between facilities, partners, and clients
 Online Entertainment, Gaming, and Gambling Provide the required compliance documents to partners, customers, and government agencies
 Professional and Technical Services Ensure that clients, inspectors, and subcontractors are aligned with consistent document control
 Tech Startups Build robust document management functionality into your disruptive product